There are a lot of Photoshop tutorials on the web but hardly any of them cover the basics. Though you can follow them to do a particular task, you will not understand the logic and concept behind the process. Those advanced photoshop tutorials assume that the reader already has an understanding of the basics.
Lack of conceptual knowledge limits your Photoshop workflow, only to the methods taught in those tutorials. And it will also prevent you from developing your own workflow.
Also, knowing Photoshop basics can improve your comprehension of these advanced tutorials.
Why Photoshop?
Despite the introduction of the Lightroom and numerous other apps, Photoshop remains the most flexible and resourceful application. The precision and control it offers are undoubtedly the best in class.
Though Photoshop looks like a difficult thing to understand, it becomes easy & fun when you know the basics.
The School of Shot(s) Newsletter
A Weekly Dose of Photo-Wisdom
Get pro tips, visual inspiration, gear talk, and more, delivered straight to your inbox.
So let’s get started.
** This tutorial is designed to be followed step by step. I recommend you do that to get a better understanding.
Open a photo to edit in Photoshop
For this tutorial, I am using a photo from Pixabay.com. I would recommend you to download the same image. However, you can use any other photo if you wish.
Image Link:- https://pixabay.com/en/berchtesgaden-mountains-2928712/
Please download the full resolution file and save it.
Then follow the below steps:
- Open Adobe Photoshop
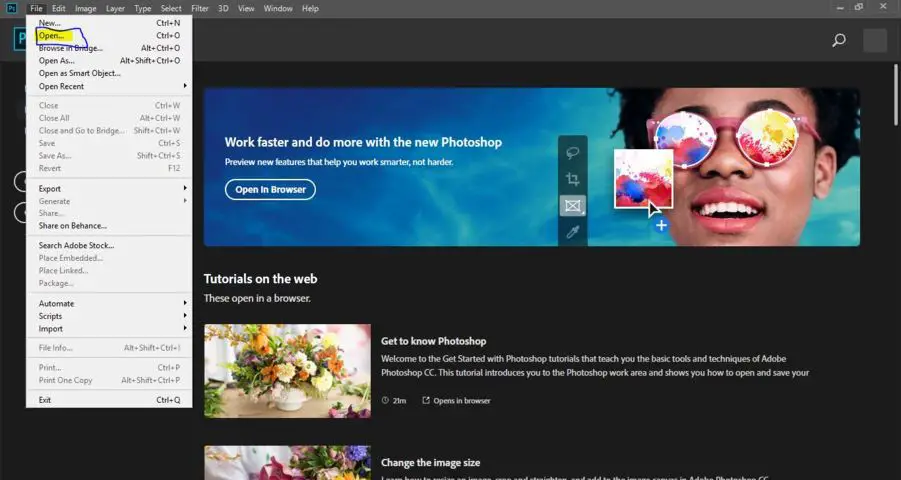
- Click File>Open
- Select the file you just downloaded and click Open
- Click the button on the top right to choose workspace as photography (as shown below)

Doing this will make the workspace ideal for photo editing. You can revert this action later if you need to.

Once done, your workspace will look like the above.
Before we start the process, let’s understand few things.
What is a layer?
In Photoshop, the layer is one of the basic yet the most useful feature.
Layers can be very confusing to understand for beginners. So let me simplify it for you.
Imagine, The weather is very cold and so you decide to wear multiple clothes. A t-shirt, a sweater on top of it and a jacket on top of it. These are the layers. One on top of another.
Yes, It’s the same thing in Photoshop also.
But in Photoshop, all layers can have different properties and these can be used in many ways. We will discuss that below but before that. Let’s see where to find layers and create one.
The long boxed area in the right, as can be seen in the image below, contains all the layers.

When we open an image, it creates a base layer which is called “Background” layer. As shown above in the picture.
By default, this layer is locked(marked in blue). Therefore, you can’t make changes to this layer. However, the layer can be unlocked by clicking on the lock icon on the layer. But I would recommend you to create a copy of this layer so that the original photo is preserved for comparison later.
As I have shown below, to create a copy of the “Background” Layer. Press Ctrl + J on a windows pc or Cmd + J on a Mac
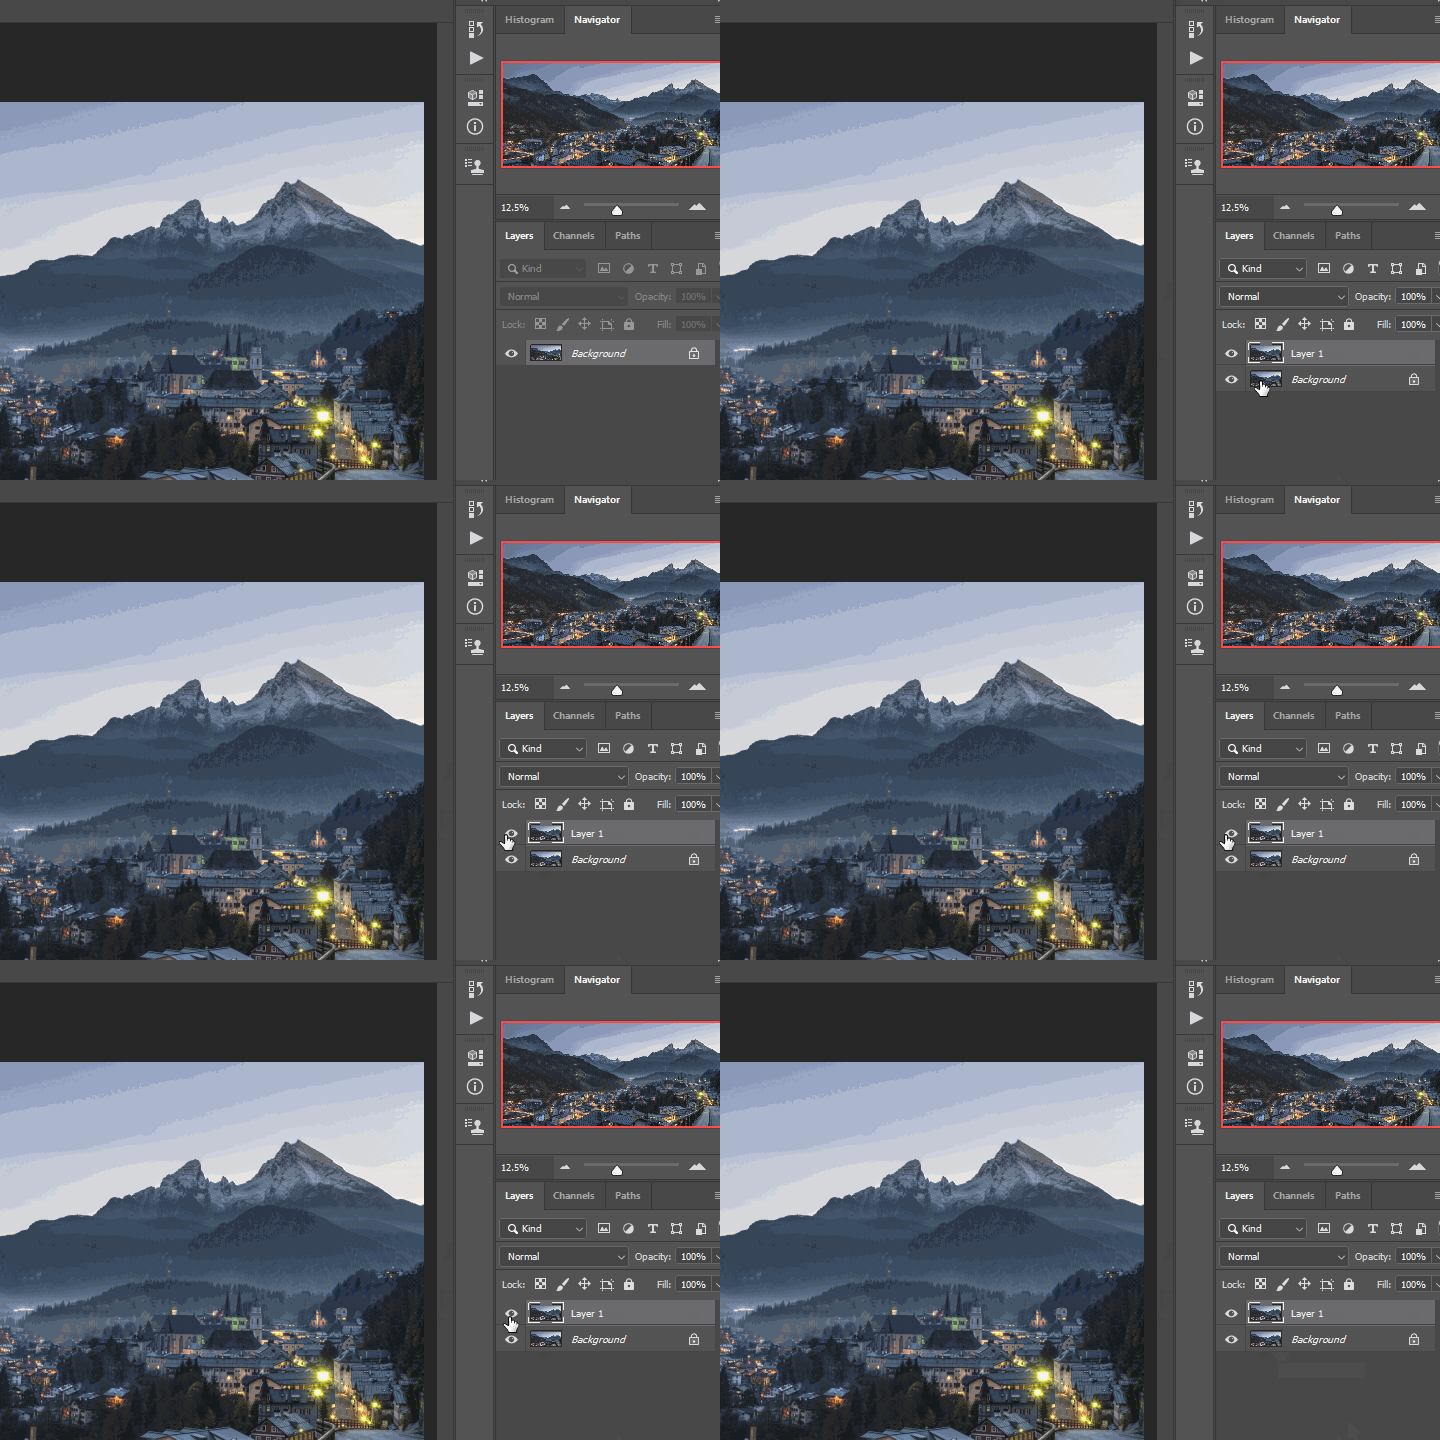
Now, as can be seen above, there are two layers.
Also check: Editing Photos can be FUN !
Visibility of layers
So for the above example of layers of clothing. You have worn a t-shirt and a sweater on top of it and a jacket on top of it. If you want your sweater to be visible you will need to remove the jacket. But in Photoshop, you can toggle the visibility of layers with a button. An eye-shaped button that determines if the layer is visible or not. If the eye is white the layer is visible. See the GIF above.
However, the sequence of layer matters. The topmost layer would appear on the screen always and it will conceal whatever is in the layers below it. This isn’t visible in the layers we created yet because we have two identical layers.
Also note that only visible layers are included when we save the final image.
Recommended Gear Guide
Opacity of layers
Opacity is another feature that can be used to control the visibility of layers.
For example, you have two layers and one of them has some color effect. And in case, you want to reduce the intensity of the effect. For this purpose, you can reduce the opacity of that particular layer. Basically, it determines how opaque is the layer. We will see this in detail in another section below. At this point, let’s see how to change the opacity.
In the GIF above, using the opacity slider, I reduced the opacity of Layer 1 to 10%. Try doing the same.

Make sure to select the Layer 1 before using the opacity slider like in the GIF above.
For the time being we will reset the opacity back to 100%.
What is a layer mask?
Let’s take the case of clothes again. So you are wearing a jacket on the top of all other layers of clothing. However, you want to reveal a bit of sweater which is underneath it. What would you do?
You’ll unzip the jacket. And consequently it will reveal a part of what’s underneath.
Similarly , a Layer mask is like unzipping of the jacket.
A layer mask allows you to conceal and reveal parts of a layer.
First let’s see How to create a a layer mask and what it looks like.
Select Layer 1 and click on the mask button as can be seen below in the GIF. A rectangular white box will appear next to the Layer 1.
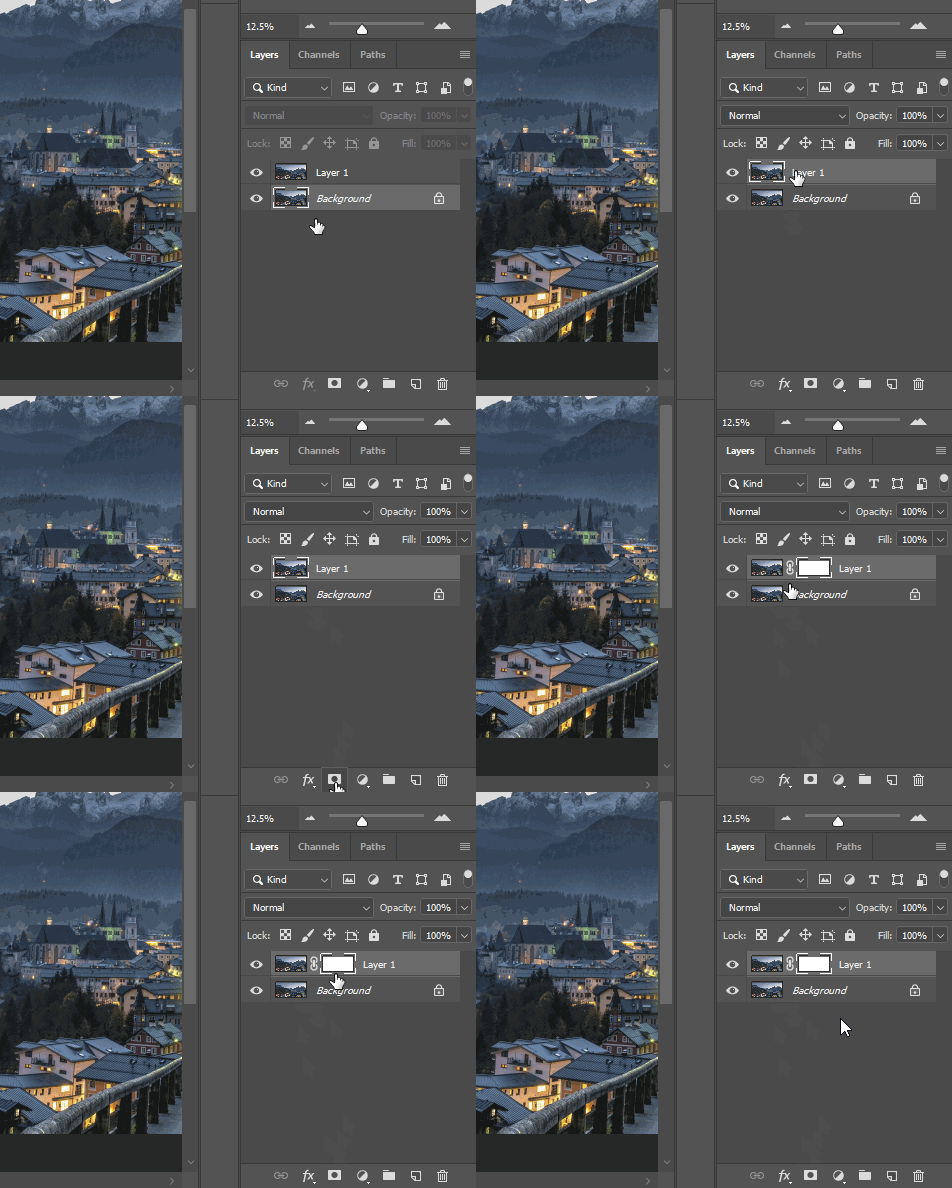
We will see how masking works in the “Basics of Masking in Photoshop” section at the end of this article.
Crop Tool
Crop tool is located on the top left of the toolbar.

There are multiple ratios available for cropping. You can either choose one of them or crop freely using Ratio and Clear button(highlighted in the image below).

There is also a straighten tool. Double-clicking the straighten button will automatically straighten the image. This is certainly, a very useful feature for tilted photos.
Understanding the Histogram
We’re talking about histogram because we need to understand it for using some of the adjustment layers.

In essence, a Histogram is a graph that shows which pixels got exposed to light. Basically, It represents the tonal range a photo has. There are a few basic things you should know about the Histogram.
The left side represents shadows whereas the right side represents highlights. On the other hand, the stretch in the middle is mid-tones.
The range on which the graph is made is from 0 to 255. Where 0 is pure black and 255 is pure white. Basically, a photograph that covers the entire range from 0 to 255 is ideally a well-exposed photo. On the histogram it means there is information right from one edge to another.

However, at the same time, it is not true for all photos.
To understand this better, you should know what is clipping.
What is clipping?
So for example, think of 0 to 255 as a container. Whatever goes beyond this range is outside the container and hence, out of range.
When the graph touches either of the edges, we call it clipping. As can be seen below.
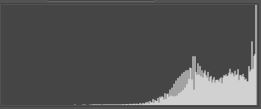
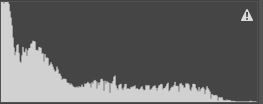
So what basically happened is, that we got an area in the photo which is beyond the range of 0 to 255. To put it another way, some parts of the photo either got too bright or too dark to a point that the details are lost.
But for a photo with a large amount of pure black and pure white the histogram may show clipping. Like a photo taken with a black backdrop or a photo that includes a lot of snow.
This information must be remembered because adjustment layers like levels and curves use histogram as the base for making adjustments.
If you want to read more about the histograms, check out this article.
Adjustment Layers
Adjustment layers allow you to do targeted adjustments to your photo. There are many types of adjustment layers available in Adobe Photoshop, however, in this tutorial, we will talk about the basic layers which are most useful for photography workflow. See below to find adjustment layers menu.

Levels
We talked about the tonal range above and how an ideal histogram is spread well across the range. But let's say you have an image which isn't well spread.
Like the histogram of our image, there is blank space in the shadows side, as can be seen below.

What this means is that the tonal range of photo is smaller than the range of 0 to 255. Means there is no pure black in the photo.
With levels adjustment layer, We can set up the back point to the place from where the graph starts. Doing this will mean we are setting what should be the pure black, as a result we are increasing the contrast. Let's try doing this.
- Create a levels adjustment layer (as shown above)

- Now, pull the black point till the point from where the graph starts. It would look something like the below

The resultant new histogram as shown above, has the tonal range fully covered. Also, this has increased the contrast in the photo.
- Confirm the effect by toggling the "Eye" button (as shown above in "Visibility of Layers" Section)
- Also, you can reduce the intensity of the effect by playing with the opacity of the levels layer
This was adjustment of just the shadows, however you can play with highlights and mid-tones as well. To read about levels in-depth, check out this article.
Also Check: Amazing HDR photos made easy.
Curves
After levels, Curves in Photoshop is a versatile tool. It can help you improve contrast, brightness, and color. There are also many other applications of the curves tool.
- Choose curves from the adjustment layers menu

The slider which is marked 1 and 2 have the same functionality as we have seen in layers. These black and white points can be used to control the tonal range of the photo. Though, the curves tool doesn't have the mid-tones point.
However, the straight line which is marked with number 3 is what makes curve so versatile.
This line is a tool which can make parts of the image bright or dark. How this works is by moving the line, up and down. As shown above, the left side of the histogram denotes shadows and the right side shows highlights.
- Hold the curve line in the middle and pull it up

As can be seen in the above GIF. When we pull up the curve line from the middle the image brightens up. Pulling up will brighten whereas pulling down will darken. The curve layer is based on the histogram, so we can use it to brighten or darken selectively.
Let's increase the contrast in the photo by selectively editing the curve line.
The S-Curve
Creating an S-shaped curvature on the curve line is a good way to increase contrast and punch in the photo. What we basically do is, we make the shadows darker and highlights and mid-tones slightly brighter.

- Create an S-shaped curve as shown above by pulling down the shadows and raising the highlights
- Check the before and after effect by using the "Eye" button
- If the effect is too much, reduce the opacity of the curve layer as per your liking
This is one of the basic ways to improve contrast using curves in Photoshop.
Though you might be wondering how to find which part of histogram denotes which pixels of the image. For that, use the little hand tool on the curves adjustment layer and hover it over the image to find out where an area of the photo is located on the histogram. Also, you can click and drag it up and down to brighten or darken that part of the image. Try this.

Curves layer offer so much functionality that it deserves an article of its own. I will happily write one If there is enough demand. So make sure you ask in the comments If you want that.
Black & White
- Choose black and white layer from the adjustment layers menu and it will turn your image into b&w

When you are converting a color photograph into a black and white one, you should keep in mind the original colors. Because Black and White adjustment layer allows you to control how white or black a particular color would look. Let's see how.
- Make the black and white layer invisible using the "Eye" button
- Note the colors in the photo, there is a blue tint overall and the buildings are lit in yellow-orange light
- Now make the b&w layer visible again and pull the blue slider to -4, yellow to 125 and red to 93 value. Do you see the difference?
You'll notice the difference because now you have selectively targeted the colors. This was just a demo and you can choose the effect the way you like.
Apart from this, there are also presets available in the drop-down menu. You can try those as well.
As mentioned above, only visible layers show up in the final image, We will make this layer invisible as we do not want black and white final image.
*Make sure that the B&W layer is invisible (use EYE button) before following the steps ahead.
Hue/Saturation
Before we learn the Hue/Saturation adjustment, we should first understand what is hue and saturation. The Hue is the color & the Saturation is the intensity of color.
For example, if you change the hue of yellow color, you can make it orange-ish-yellow or lime-yellow. But when you are changing saturation, you are changing how strong and punchy the color looks or you are changing the amount of color.
Also, there is an option of lightness which controls how bright or dark a color is.
- Create a Hue/Saturation layer from the adjustment layers menu

As can be seen above, we have plenty of sliders in the Hue/Saturation adjustment layer. The number 1 is a drop-down to select individual colors, which is set to master, which means it is currently set to global settings for all colors. Number 2 is the hue slider and 3 is saturation slider whereas number 4 is lightness.
Follow the below steps
- Select the hand tool
- Go to the area of the image show below
- Now press and hold ctrl or cmd and drag your slider left or right, this will change the hue. I've set it to -10 as can be seen in the GIF below.
You will see that the part where there are street lights, is changing. Also note that the drop-down box which showed Master now says Yellows, which means that now we are targeting only the yellow color in the photo.

*Note the movement in lower middle part of the above GIF
- Simply click (not pressing Ctrl) and drag it left or right to increase or decrease the saturation. I've set it to +26, as shown above in the GIF
- Check the effect by toggling the "Eye" on the Hue/Saturation layer
Now, let's talk about the lightness slider. Lightness changes how bright or dark the color looks. The best way to understand its effect is to experiment with it. Try sliding the lightness slider to the left end and then to the right end. You will see how lightness affects not the color but just the luminosity of the color.
The way we targeted yellows, you can target any other color or you can do this to the whole image by adjusting the Master values. But you need to remember a few things when using Hue/Saturation slider in Photoshop.
Things to remember
- If you want to change the color, use the Hue slider
- And if you want to change the amount of the color, use the Saturation slider
- If you want to change how bright or dark the color looks, use the lightness slider
- First, adjust the Hue then the saturation for a color
- Never adjust the lightness slider on the Master
Color-Lookup
This adjustment layer is the most interesting of all in Photoshop. You can put a lot of different filters in your photos using the Color Lookup adjustment layer.
- Create a new Color Lookup layer using the adjustment layer menu
- Make sure 3DLUT File radio button is selected

- Click the drop-down menu where it says Load 3D LUT
- Choose "Fuji Eterna 250d Fuji 3510 (by Adobe).cube"
- Toggle the Eye button to see the effect
- Reduce the opacity of the color lookup layer as per your liking
This was just an example of how you can change the look of an image using various filters.
Also you can mix effects of many different filters by creating more color lookup layers and playing with opacity of each layer.
Basics of Masking in Photoshop
So until now, We have seen a lot of different adjustments we can do to the photo. But all of the adjustments and effects we have tried so far were global, meaning they affect the image as a whole, except for the Hue/Saturation where we targeted the colors specifically.
Now we will see how we can apply any adjustment specifically to a particular area.
For that we will need to understand the concept of masking.
Masking in Photoshop means revealing and concealing parts of a layer. To facilitate masking, Photoshop has a few tools, one of them we will discuss below.
Brush Tool
The Brush tool in Photoshop can be used for basic masking and a wide variety of tasks.
It is used to paint an area, you can either paint on the layer or the layer mask. For the purpose of masking, we will paint the layer mask. But first know the importance of black and white colors.
The Role of Black and White colors in masking
The most important thing to keep in mind is that Black Conceals and White Reveals.
A layer mask is of the same size as the layer and when you paint black or white on the layer mask on an area, it will affect the corresponding area on the main layer. So if you paint an area black, the mask will conceal that particular area of the layer. If you couldn't understand it now, hold on as I will demo it below.
Create a base layer to mask
- Create a new color lookup layer as shown above in the previous heading
- Choose Late Sunset in the 3DLUT drop down menu
- Reduce the Opacity of the color lookup layer to 50%

- Choose the layer mask on the color lookup layer

- Select the brush tool from the tools panel

When using brush there are few options you need to change to make it ideal for masking job.

Size is the actual size of the brush in pixels.
The Hardness slider determines how soft or hard is the edge of the brush. Look at the circles marked in blue and black in the image above. The blue one is a soft brush and the black one is hard. Notice the difference in edges.
- Choose a hardness of around 7 to 10%
- Choose the brush size around 300 pixels
The foreground color is the color which the brush will paint. As we have discussed, white reveals and black conceals. Here we want to conceal the effect of the layer in some areas. So we will paint with black. Foreground color is the color on the top of the palette, which is black in this case.

You can toggle the foreground color by pressing X. Try it.
If for some reason there is a different color in the palette, other than black and white, you can restore defaults by pressing D.
As you can see there is a warm effect in the current color lookup layer. And I want this to be limited to just the sky. So in order to do that I will paint the area other than sky, black. As we know black conceals, It will hide the effect.
Follow the below steps to mask
- Change the brush size to 800 Pixels
- With mask selected start running the brush over the edge of the mountains
- You will see that the area where you run brush becomes black in the mask

- Press alt and click on the layer mask
- You will see the layer mask on screen and the outline your created on the edge of mountains
- Now you can increase brush size and paint the area below the outline
- The finished mask will look like this, this will only affect the areas in white color

- You can again press alt and click layer mask or click on the layer icon to go to back to the photo view
- Toggle the visibility of this layer with the eye button to see the effect which is now only on the sky
There are many ways of masking in Photoshop, this was the most basic of all. More advanced techniques are beyond the scope of this tutorial hence needs an article of its own. I would cover masking in detail in future tutorials.
Basics of Retouching in Photoshop
Retouching in Photoshop includes basic touch up and removal of the spots and other distracting elements. For portrait photography, it would also include skin softening. In this article, we will talk about a few Photoshop tools which can be used to do basic spot removal and cleaning of the image.
Spot Healing Brush Tool
This Photoshop tool uses content-aware technology. What this does is when you use this brush to remove a spot, it automatically find out what should be filled in at the place of the spot.
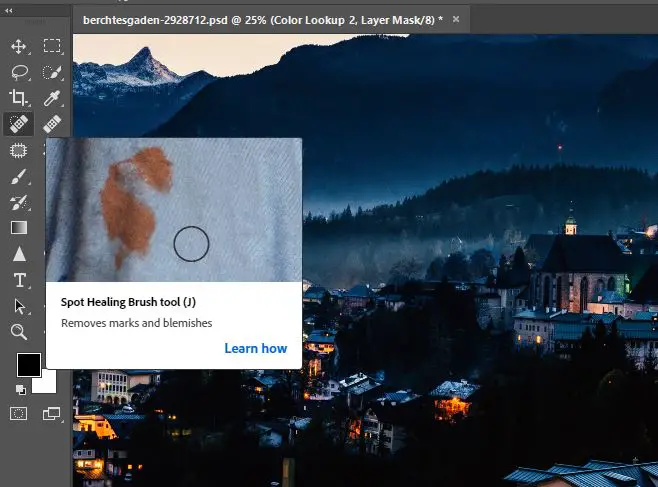
- Select the Layer 1 ( Spot healing brush doesn't work on adjustment layers)
- Zoom into the area on the bottom right of the image using the navigator
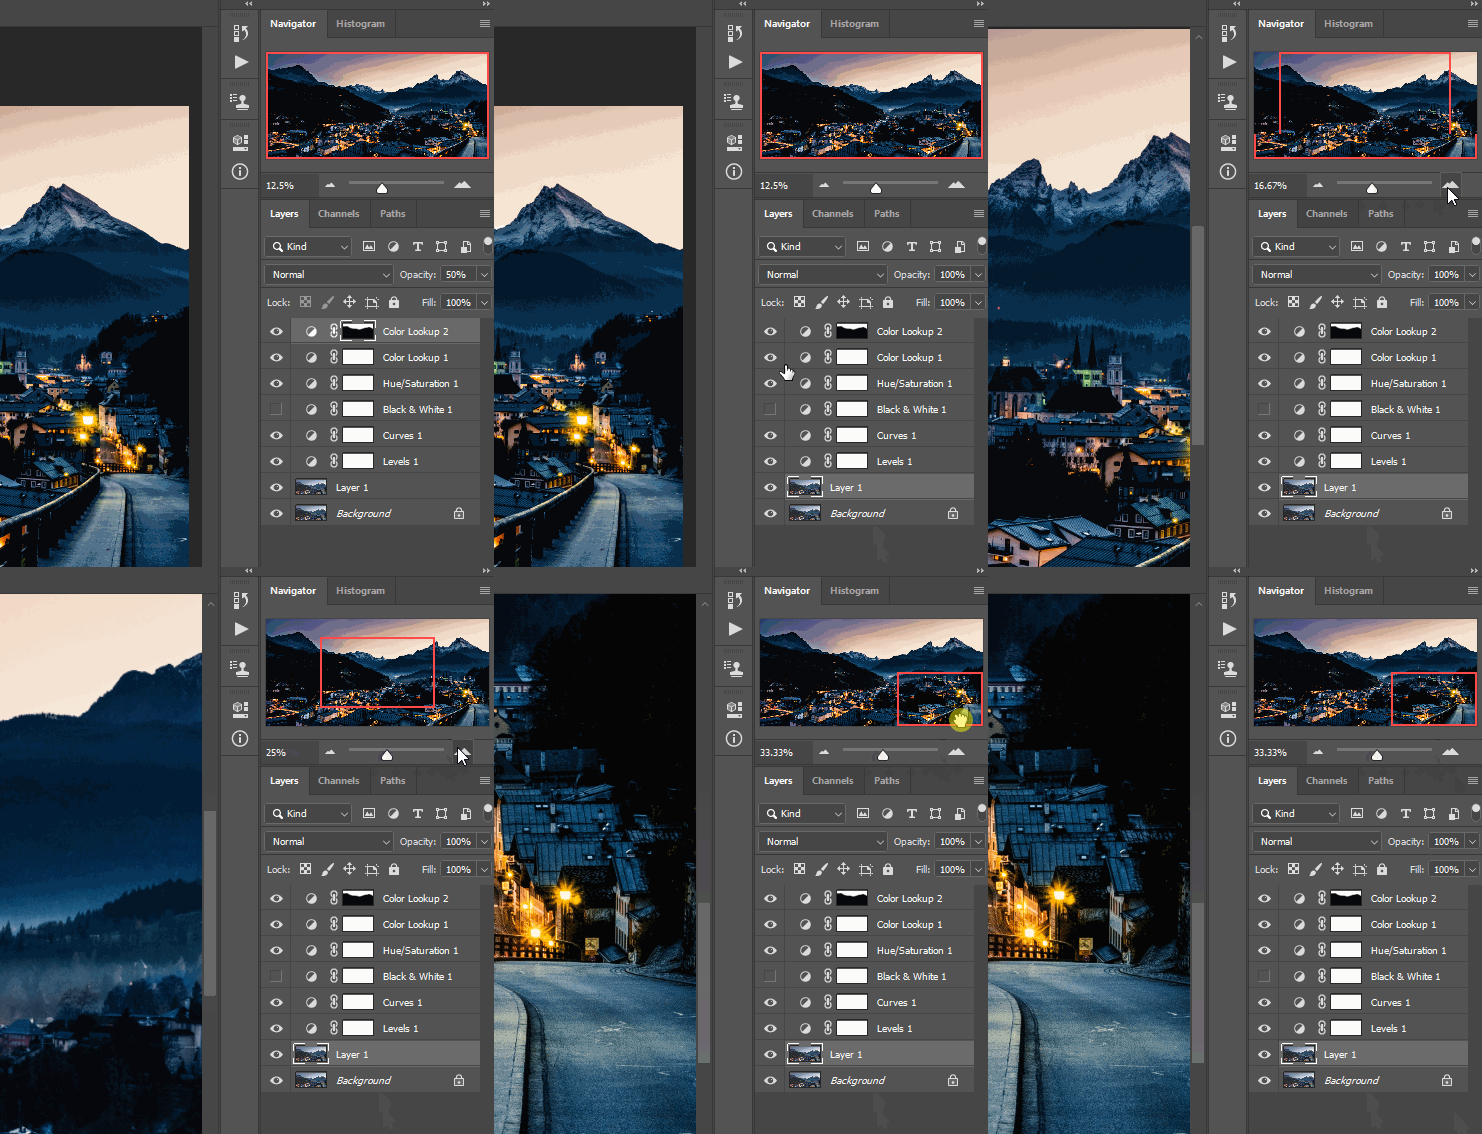
- Choose a small brush size from the top menu as we did for the brush tool, I chose 78 in this case
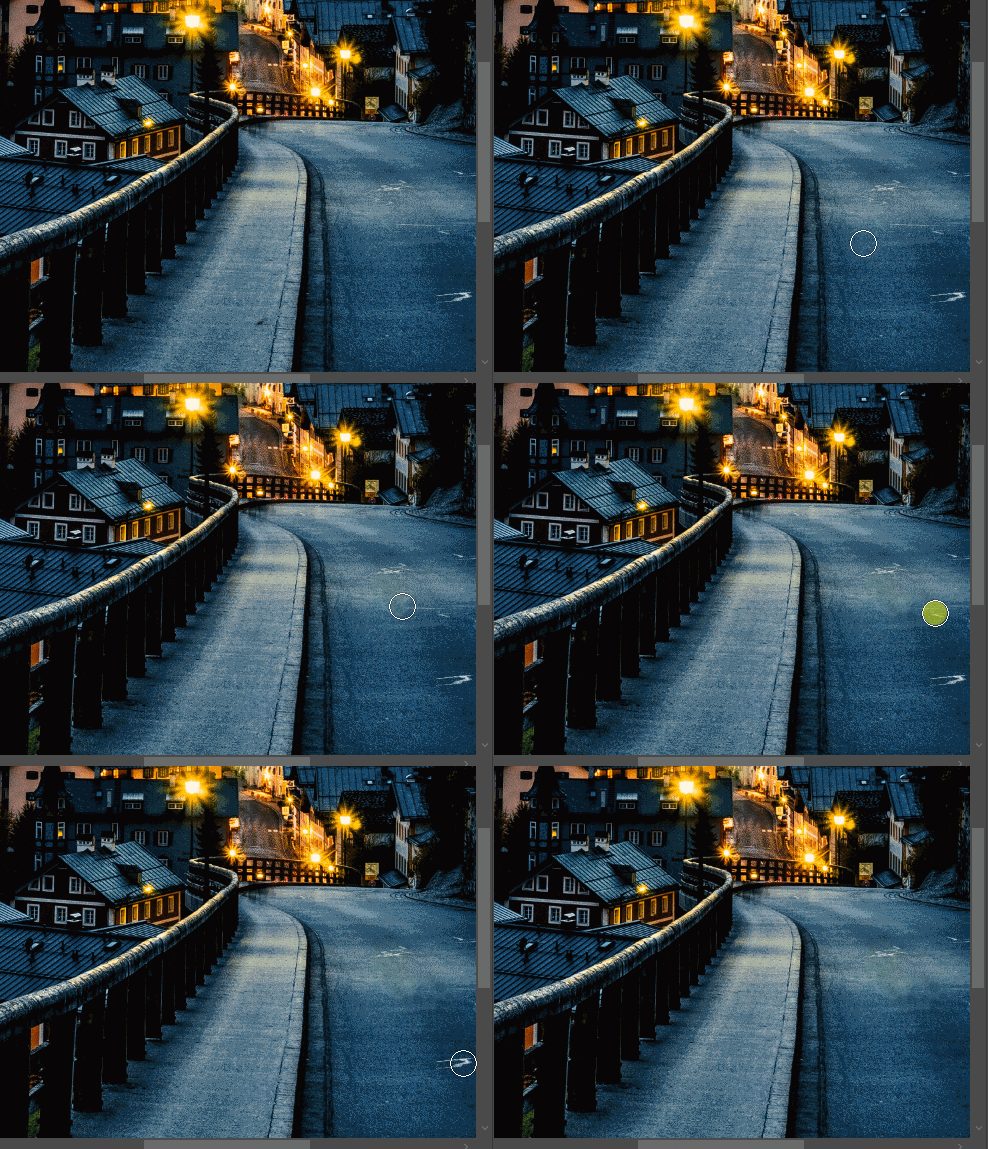
- Tap on the spots on the road
- Do not press and move, just tap once and another tap on another spot
- Look at the GIF below
Clone Stamp Tool
As I mentioned above, Spot healing brush uses content-aware technology, which does a very accurate job in most cases but sometimes it struggles to make an accurate patch.
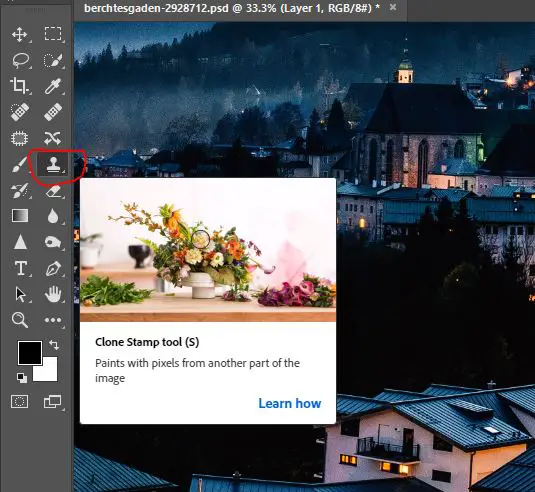
In such times, we can use the Clone Stamp Tool.
What Clone Stamp Tool does is that it copies from another area and paste it at your desired place.
There can be many ways to clone in Photoshop but this is the easiest of all.
Let's see it in action.
- Select the clone stamp tool from the panel
- Choose a medium brush size, I chose 120 in this case
You need to define the area you are copying. For that you need to first find an area which is similar to the place you have spots on.
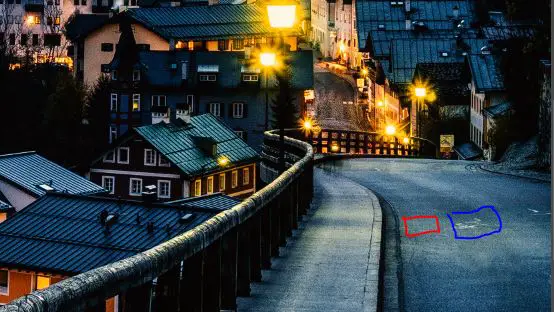
In this case, we will copy the area marked with a red box into the place of blue, where there is a big spot.
- Press ALT and tap the area in the red box to define the area to be copied
- Tap on the spot and keep tapping a few times until the spot is gone
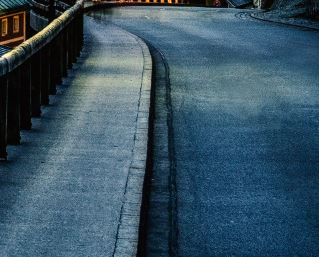
The final result will look something like this
Check the Before and After
- Select all the layers except the Background Layer by pressing ctrl or cmd while selecting
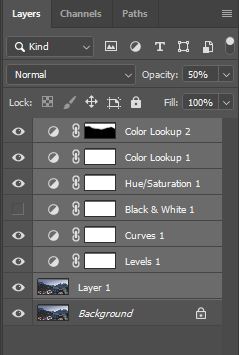
- Press Ctrl + G on Windows or Cmd + G on Mac to create a group of layers
- Toggle the group visibility using Eye Button to see the before and after

- You can ungroup the layers now by right-clicking on the group and press Ungroup Layers
Save the file
To save the file, follow below steps
- Click File> Save As
- Choose JPEG in Save As Type
- Choose your desired location & filename
- Click Save
- Choose the quality of minimum 8
- And in Format Options, choose Baseline optimized
Conclusion
With this article, I covered Photoshop's basic concepts and If you've followed it till here you have already built a good foundation. Adobe Photoshop is a very flexible application and the beauty of it is that once you know the basics you can develop your workflow and create your own ways of doing things.
Hope you have liked this article.
Writing this took a lot of hard-work and If you have liked this article, it is a humble request to you that please share it with your friends or people who may need this.
If you have any queries related to any of the steps or tools we used, Please ask in comments.
Yatharth


Thank you so much for this valuable tutorial. Learned alot of basic stuffs due to this. love from Kerala
I’m glad you found it useful. Thank you for your support! :)
A very useful article, thanks alot Yatharth, is the first article that I find in the web understandable for a beginner in Ps, thanks again!!!
Sergio, I’m glad to know you found it useful. Thanks for the appreciation. It motivates me to work harder on next articles. Thank You Very Much!!
Thank you sooooo much. This was incredibly helpful and the GIFs really walked me through what words can’t do. Thank you.
Thank You Melissa, I’m happy to hear you found it helpful. Also, thanks for sharing your feedback. It motivates me to keep producing more such content. :)
Great intro article mate. Would appreciate a curves article when you get the chance.
Thank You Chaitan. Yes I am planning to create a seperate article on curves. :)
An excellent easy to follow guide. I can now use photoshop with confidence.
Thank You Mary. I truly appreciate your kind words. And I’m glad you found it easy to follow. :)
I know this site will be very helpful to me
Thanks Chelee. I am planning to post new content very soon. Please visit back soon. :)
very educative thanks for this
Thank You :)
I thank you so much for given me phenomenon teaching on mine first day with you it wonderful I hope you will send me the booklet on this via pdf.thank you.
this beats all the youtube videos I wasted time on. Thank you..
Thank You Norhana. I’m glad you found it better than the YouTube videos. This means a lot.
Thank you so much for this! everything is well explained.
Thanks Omer. I’m glad you found this helpful. :)
Thanks for taking the time to cover the basics! It’s very useful.
Thank You Susie. I’m happy to know you found it useful. :)
Thank you so much for the knowledge at 67 years old and just starting out I found this the best Intro to PS again …………….Thanks from Australia
Thank You so much for your kind words. I am very happy to hear you had a good learning experience. :)
thank you very much for the help,kindly asking for a soft copy of this article(PDF)
Glad you found it useful. I’m afraid I don’t have the PDF of the same.
As someone who is definitely not doing enough of these things, I found this succinct list really useful. Thanks for sharing it with us. The maximum time I have been using a pen tool for my photo editing work.
Thanks Yusuf. Happy to know you found this useful. :)
Hi,
I am from Pune.I am an amature photographer.I have recently started processing my files.I am not a computer geek like you and at my age [i am 76] with my little knowledge of photoshop things were going haywire until i came across your tutorial.After scanning through i was happy that i have met a teacher.You have explained things in a very
simple way to understand the basics and hope i will be a step forward.
Thank you very much and may God bless you.Please take care and be safe.
Talk to you soon and bye for now.
Vijay
Hello Sir,
I’m delighted to hear my tutorial could help you.
Thank you very much for your kind words.
You too please take care and be safe.
Thank You :)
Thanks for a quick reply.I do appreciate it.Pl. tell me will it be possible for you to clear my doubts whenever
i have some?If so please let me know where can i put the question?
Thanks.Good night and bye for now.
Vijay.
Hello sir,
I am an Arc, I have difficulty on understanding Photoshop tutorial online until I met this article. It’s very simple to understand. I look forward to more articles from you.
Thank you
Hello,
I’m delighted to know my tutorial could help you.
Thank you :)
Easy and fluent presentation. Thanks.
Thanks for your kind words. :)
Yatharth I found this article very useful, in particular, your tip Spot healing brush doesn’t work on adjustment layers and usage of Clone Stamp Tool. I appreciate your effort to make whole article easy to understand Thank
You may send your future articles on my email, if you prefer.
Thank you. I’m glad to hear you found it useful. I see that you have subscribed to the mailing list. You’ll definitely be receiving updates about future articles :)
Thank you so much for this useful article! With so many tools on photoshop it has been really hard for me to know where to start but your article kept me focused and i was finally able to really start learning! :)
Thank You. I’m happy to know my article helped you start with Photoshop. Keep learning!
This was awesome! Cleared up so much and helped my workflow tremendously.
Happy to hear that, Holly. Thank You :)
Infact i dont know how to thank you. I have been reading tutorials but I’ve never come across one that this simple to understand. You have made me to understand what i was straggling to.
Expecting more tutorials boss
More blessings.
Thank you very much.
I’m glad to hear you found this easy to understand and helpful.
Thank you for all the basics and the practical examples it helped me a lot to understand Photoshop much better. Please don’t stop. For me as an amateur photographer, I am looking forward for your next tutorial.
I’m happy to hear you found it helpful. Thank You. And yes, I’m preparing new tutorials :)
Thank u so much
You’re welcome :)
You doing great job.how you explain in simplicity manner.i feel lucky myself that i gets your content. Love you brother …
Thank you for your kind words brother… I really appreciate the support :)
Thank you very much brother
Thank you very much brother
loved that i could follow the tuturial step by step, however for some reason i was missing layer 1, and then the brush tools would not work, but overall i really appreciate how you put the tuturial together.
I may try doing this tuturial again and see if it works the next time.
A great course, I originally paid for another basic course, but this course is SO much better and clearer to understand. Thank-you!
Thanks Gloria. Happy to hear you find it helpful. :)
Thank you, Gloria :)
A great course, I originally paid for another basic course, but this course is SO much better and clearer to understand. Thank-you!
Thanks Gloria. Happy to hear you find it helpful. :)
Used this a lot in the past been in hospital a while find in invaluable as I get older brilliant reference book Thanx
Hello Yatharth, best regards from Málaga in Spain. I am enormously thankful for this article, it has helped me to understand the basics. Daniabad, mere pyare dost, bahut accha! Norberto
Aapka bhi bahut dhanyawaad :)
Thank you so much for this lesson even though thou had some small challenges have learnt something
Glad to know you learnt something from this article :)